Analysis of the AkuAuction smart contract.

The AkuAuction smart contract had several core defect, including not handling multiple bids and open itself up to a DoS attack. Here is an easy to understand breakdown.

Introduction

Micah Johnson’s Akutar’s drop has been well talked about in the NFT scene recently due to defects in the auction smart contract. This post is an effort to explain what happened (in non-technical language) and to offer ways to prevent similar issues in future contracts.

There is no negativity or judgement in this post. I believe we are still early in building NFT contracts and communities. We need to learn form each other, support each other, and continue to evolve in order to create a positive, generous community.

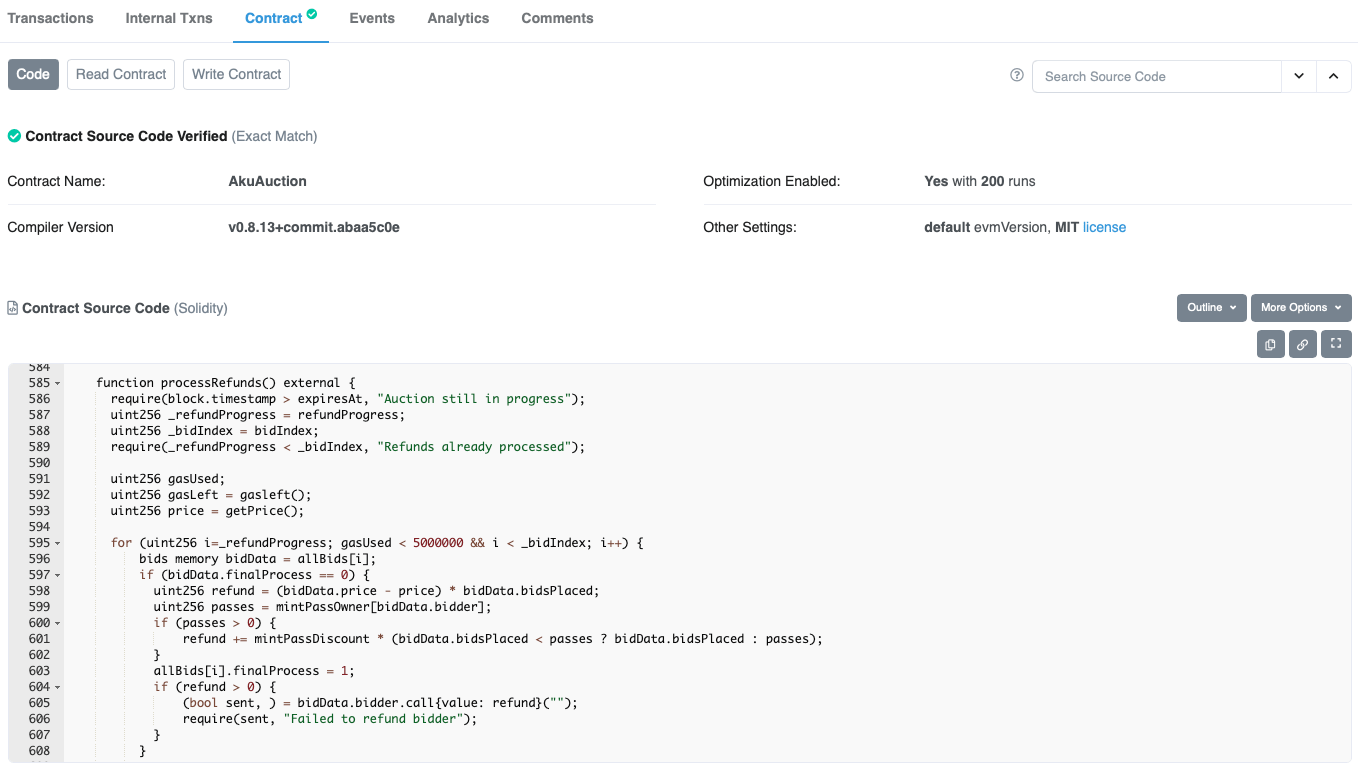
Here is the AkuAuction smart contract, for your reference. Don’t worry if you can’t understand it as I will explain the relevant parts:

https://etherscan.io/address/0xf42c318dbfbaab0eee040279c6a2588fa01a961d#code

What happened

There are two primary defects in the Smart Contract, resulting in two separate incidents:

  1. Dutch Auction refunds were temporarily frozen.
  2. Proceeds from the sale are forever locked in the contract.

Defect 1: Frozen Refunds

There was an exploit in the logic of the “processRefunds” function that allowed an attacker to halt the refund process. This can be considered a Denial of Service (DoS) vulnerability. Just like how a website can become unavailable because of too much traffic, the AkuAuction contract’s refund function was rendered unavailable by an external smart contract.

To understand the vulnerability, let’s look at how the AkuAuction contract refund logic works. There are 4 main steps:

  1. Get each bidder sequentially
  2. Refund them some ETH
  3. Check to make sure the refund was successful
  4. Get the next bidder in the sequence and repeat

The vulnerability here lies in step 3. To explain, we can discuss briefly the two types of participants on the Ethereum network:

  1. A user with a wallet (referred to as an “Externally Owned Account” or EOA)
  2. A smart contract

If a bidder sent funds from a regular wallet (e.g MetaMask) then the refund is simply sent back to their wallet in a regular old wallet-to-wallet transaction. No problem.

However, if a bidder sent funds from a smart contract, they can modify how the refund is handled on their side. Smart contracts can act like EOAs, but they offer developers the opportunity to change how “payable” transactions work (payable meaning any transaction that can accept ETH). The attacker wrote a smart contract that would cause any ETH sent to it to return a failure message. The AkuAuction refund logic captured that failure and would try to re-send the ETH. And it would fail again, and again. Rinse and Repeat.

Since the refund logic gets bidders sequentially in the order they bid, there was no way to skip this malicious bidder. The result was that anyone who bid after them could not receive their refund since the refund function could not proceed. Thankfully the attacker built in a switch to allow their contract to eventually receive funds, which then unlocked the refunds for all the other bidders.

Proposed Solutions

So how could this have been prevented?

Option 1: Deny Smart Contract Bids

The blunt force approach would have been to deny smart contracts from placing a bid. It is a simple check in Solidity and could have been added last minute. However, it is a really a poor approach as it prevents multi-sig wallets or more advanced security wallets from bidding. Ideally the contract is secure no matter who calls it.. but in a pinch, it would have worked.

Option 2: Ignore Refund Failures

The naive way to do this is to just send the refund and don’t care if it succeeded. That would require the least amount of code changes. A more robust approach would be to flag the refund as “Failed” on the bidder and then handle it manually later. This would require a few small code changes, but nothing drastic.

As a note: There are some ways a bidder could try and grief AkuAuction using smart contracts, with this approach, but as far as I’m aware it would just result in burning gas from the AkuAuction contract and would still allow for the refunds to process.

Option 3: Require bidders to claim their refund

This is a simpler to implement than what was built and could cut down both on gas and extra code. Ultimately deferring the refund to the bidder removes a lot of the liability and security issues involved in “pushing” ETH to users. The general rule of thumb for payments is “pull, not push”. This function would check to see if the wallet had placed any bids and still needed to be refunded. If so, send them the ETH. If not, do nothing.

One caveat is the the bidders would have to pay a small amount of gas for their refund. One could include a small gas-stipend in the refund as a make good.

This option would require a lot of code changes to the contract, but would also simplify everything in the process. This would be my recommend approach as it removes the need for the contract push funds to thousands of other EOAs or contracts.

Defect 2: Locked Proceeds

This one is sucks and is gut-wrenching. Please understand that it is so much easier for me to analyze (and for people to criticize) this stuff after the fact. Having a defect that allows funds to be locked up is a LOT of emotional and mental anguish on the team to bear. Remember that before you go FUDing.

The explanation of what went wrong here is simple: The Auction contract did not properly account for multiple bids by the same bidder.

There are two primary counters in the contract: “Total Bids” and “Refunds Issued” (referred to as “refundProgress” in the contract).

To make a bid, the “bid” function is called with the amount of bids to make. After some validation, the “Total Bids” counter increments by the “amount” of bids being made. So if there were 10 existing bids and I placed 2 more, the count would increase to 12.

In order to call the “claimProjectFunds” function, the smart contract requires that the Dutch Auction refunds be issued. It does this by checking to make sure that the “Refunds Issued” counter is greater than or equal to the “Total Bids” counter. The project funds then can not be claimed if there are less refunds than bids. The intent here is to prove to the public that the Akutars team could not withdraw until the auction finished and all refunds were processed — which is a great intent!

The defect here is in how the “processRefunds” function was written: when refunding a bidder with multiple bids, it increments the “Refunds Issued” by one, regardless of how many bids the bidder made. So if I made 2 bids like above, and there were 10 refunds already issued, the “Refunds Issued” counter would only increment to 11, but the “Total Bids” counter is 12.

Thus every call to “claimProjectFunds” fails because “Refunds Issued” is less than “Total Bids”. For those curious, the smart contract has “Total Bids” set to 5,495 and “Refunds Issued” set to 3,669, meaning that 1,826 bidders submitted more than one bid.

Solutions

So how could this have been prevented?

Option 1: Better testing

Sadly this is the easiest answer. There are several different counters used in the code, all used slightly different. Having proper tests written to ensure that multiple bids could be accepted, refunded, and then withdrawn would have caught this. Once caught, it would have only required a small change to a single line of code.

Option 2: Use State Management

The current implementation ensures that all refunds + gas are removed from the smart contract’s ETH balance before allowing the project owner to claim. This makes senses for accountability reasons, but also makes the logic for calculating for the claim complicated. If you were to use a “state” that indicated when the refunds were finished, then there would be no need to compare the different counters.

A naive implementation of this would be to set “refundsIssued = true” once the existing “processRefunds” function saw that there were no more refunds to process. Then in “claimProjectFunds” require that “refundsIssued” is true before allowing the claim. This removes all need for counter comparison in the claim function.

A more robust, but nuanced solution would be start a “Refund Claim” period were bidders would “pull” their refunds.. say 48 hours. After that, the project owners would be allowed to claim their funds. The project owners could then manually refund any wallet who didn’t claim their refund during this period, or could leave a refund buffer in the Auction contract.

Option 3: Emergency Withdraw

There is an existing function for bidders, so implementing this for the project owner could also work. The best way would be to time lock it.. say 3 days after the refunds were issued, allow the project owner to withdraw funds no matter what. OR if the community really trusted you, don’t put any restrictions on it at all!

Ethereum offers all smart contracts the ability to “self destruct” and send all contract funds to an address. Unfortunately this method is private by default, so if you wanted to expose it to the contract owner, it would need to be added to the contract in advance.

Wrap Up

Building smart contracts is hard — you generally only have one shot. As a dev, one really needs to embrace community code reviews and audits, and do so without ego. As a collector, it can be extremely difficult to understand what is actually happening when something goes wrong.

Hopefully this post has helped explain -in not too much technical detail- what happened with this auction, and how future drops can learn from it.

Splitting python code into multiple services inside of a single folder/monorepo using VS Code while ensuring automatic pylint coverage.

Or.. why you should learn how to use workspaces in VS Code

TL;DR Issue: I wanted to have multiple sub-folders inside of a project act as their own root space, using their own virtualenvs, with their own Dockerfiles and Pipefiles, etc.. but ran into an issue with the pylint extension not referencing the correct virtualenv

TL;DR Solution: Make a .vscode folder in your root that has a “project-name.code-workspace” file inside of it that looks like the below and then open your Workspace in VS Code using that file (and not the root project folder). See sample repo here:
https://github.com/TheRightChoyce/example-vscode-multi-root-workspace-pylint

Background

I have a project that is conceptually structured as a few different services layers, but is physically structured as a monolith application with a tightly coupled code structure. As I am trying to focus on ensuring even small projects can be easily deployed and scaled as services, I took this as an opportunity to “de-couple” the code into discrete service containers. For my purposes I wanted to keep everything in a single code repo e.g. “Monorepo”. No idea if that will help or hurt down the road, but trying to minimizing managing different repos for now.

Here is example code structure before:

app
| index.py

lib
| service1
	| get.py
	| create.py
| service2.py
	| get.py
	| create.py
| shared
	| get.py
	| create.py

Pipfile
Pipfile.lock


Here is the structure I am moving to:

app
| index.py

services
| service1
	| src
		| get.py
		| create.py
	| Dockerfile
	| Pipfile
	| Pipfile.lock
| service2
	| src
		| get.py
		| create.py
    | Dockerfile
	| Pipfile
	| Pipfile.lock

(TBD on how I want to implemented the shared functionality)

The Solution

Setting that up in VS Code is trivial because you’re just moving files. But if I opened the project root folder in VS Code.. I immediately had some issues with pylint not being able to reference anything I installed locally with Pipenv (in this case Quart, an asyncio framework compatible with Flask)

Unable to import 'quart' pylint(import-error)

$ from quart import Quart
Unable to import ‘quart’

For reference, here is the Pipfile:

[[source]]
url = "https://pypi.org/simple"
verify_ssl = true
name = "pypi"

[packages]
quart = "*"

[dev-packages]
pylint = "*"

[requires]
python_version = "3.9"

After some trial and I error I was able to get it to work by using a .code-workspace file to define a “multi-root workspace” in VS Code. Essentially this tells VS Code to view each service as the “root” of its own project and apply any extensions, linters, etc.. to only the local service. OR, simply, each folder should reference its own (and only its own) Pipfile and virtualenv.

Here is an example of what the “project-name.code-workspace” file should look like, where “project-name” is whatever name you want to give your project. This name will also show up at the top of the Explorer.

{
    "folders": [
        {
            "name": "ROOT",
            "path": "../"
        },
        {
            "name": "service1",
            "path": "../services/service1"
        },
        {
            "name": "service2",
            "path": "../services/service2"
        },
    ],
    "settings": {
        "files.exclude": {
        }
    }
}
  • folders” — These define the folders in your project that you want to treat as “root” folders that show in up the Explorer view. For me this was each service/project, but you could also customize this for individual use and only display the relevant services.
  • name” — Optional; the name to display in the Explorer view
  • path” — The relative path to the folder for each service/project
  • settings” — Any other global/project-wide settings

The “ROOT” folder is optional, but it easily lets you dig into all files and anything that is not contained inside of one of your service folders.

Once you have this, save it, close the VS Code project. Do File -> Open workspace -> then select the “project-name.code-workspace” file.

Hint– If you can’t see the .vscode folder on a Mac, press [CMD]+[SHIFT]+[.] to show “hidden” files and folders

Your explorer should look something like this now:

VS Code explorer with three top-level folders: ROOT, service1, and service2. the service folders all have their own src folder, Dockerfile, and Pipfiles.

And you linting issues should be gone!

Source Code

Here is a full example repo that you can clone to see this working in action:
https://github.com/TheRightChoyce/example-vscode-multi-root-workspace-pylint

References:

VS Code Workspace docs
https://code.visualstudio.com/docs/editor/workspaces

Quart
https://pgjones.gitlab.io/quart/index.html

Docker / Python Quickstart
https://docs.docker.com/language/python/

BONUS: Some Monorepo vs. Multirepo/Polyrepo discussions:

No Monorepos:
https://medium.com/@mattklein123/monorepos-please-dont-e9a279be011b

No Polyrepos:

Adventures with Athena Engine V2 and The Forward Slash

One of the integration pipelines I maintain for a client leverages AWS Athena as a middle tier to facilitate the transfer of data from NetSuite to Tableau. Recently this stopped working and I had to figure out why.

Quick Background

Here is a super simplified version of the data flow. In reality this flow is much more complicated!

  1. A NetSuite saved search is used as a data source
  2. Celigo is used as the iPaaS to run a daily flow to grab the data from this saved search and dump it into S3
  3. This data is made available to Athena, which creates a custom database view
  4. Tableau then connects the Athena and uses the view as its data source

The Issue

Tableau started raising the following error every time someone tried to view the workbook

An error has been thrown from the AWS Athena client. [ErrorCode: INTERNAL_ERROR_QUERY_ENGINE] Amazon Athena experienced an internal error while executing this query. Please contact AWS support for further assistance. You will not be charge for this query. We apologize for the inconvenience.

At least they are sorry?

Not super helpful. Also this client doesn’t pay for an AWS support plan, so they could not even reach out to AWS support as directed! So that error message is extra unhelpful.

After a little triage I was able to discover this error in Athena (shown with some identifying data omitted)

GENERIC_INTERNAL_ERROR: java.lang.ClassFormatError: Illegal field name “lambda_fake name/for field_123″ in class com/Facebook/presto/$gen/CursorProcessor_XXXXXXX”

That at least pointed me in the direction of the field name. Originally I thought someone changed the name of the field in the saved search in NetSuite, but after some digging that did not appear to be the case. So what happened?

The Solution

The NetSuite saved search had a forward slash “/” in one field name (which one can glean from the error message above) and that was now the root cause of the error in Athena (aka the “fake name/for field” field). Athena used that field as part of a “CREATE VIEW” statement, and the view was failing to compile due to the “/” character in a source field name.

This had all been working for almost a year though, so what changed?

AWS automatically upgraded my client to the Athena V2 engine and I believe that is what triggered this error. I did not see any reference to this in the upgrade notes/docs, but removing that “/” fixed the issue. Normally I would never put a “/” in a field name when designing a software system, but when this integration was built it worked fine we all just glossed over it : )

The final resolution involved changing the field name in NetSuite to no longer have the “/”, re-running the integration, re-running the AWS crawler to update the table definition, and then changing the “CREATE VIEW” SQL inside of Athena to reference the new field name, sans “/” (e.g. it was now just “fake name for field”). Oddly enough the view itself still has a field name with the “/” in it, but that part works just fine. Leaving it there let us only modify this part of the flow, otherwise we would need to update logic in Tableau Prep and also in a lot of the data visualizations in Tableau itself.

BONUS: The full integration pipeline

I will probably due another post on this, but for those curious, here is the full end to end integration flow:

NetSuite to Tableau integration via Celigo and AWS Athena

A few points:

  • Using an iPaaS tool like Celigo eliminates the need to build/maintain the API connection to NetSuite (currently an XML/SOAP connection). Most iPaaS are “no code” solutions and lack things like version control, easy testing, mocking, observability, etc.. but they save an incredible amount of time as they instantly connect to hundreds of cloud applications.
  • AWS Glue serves its purpose. The crawlers can be really finicky, but with a simple dataset it works fine and a good job accommodating larger datasets. In this case the NetSuite export is about 60,000 rows with about 40 columns and grows daily.
  • Athena works well for querying CSV or JSON datasets! I use it quite often in bespoke integrations
  • Tableau Prep into Tableau Online piece was supposed to be automated, however Tableau wanted to charge this client an absurd amount of money to allow them to automate Prep using their product called Conductor. My client just has someone manually run the Prep piece once a week and it takes them about 5 mins. It breaks my rule of 5, but it is easy to teach once someone has Prep installed.

That’s it!

References/Credits:

Splash image from Hert Niks on Unsplash

Setting up Jest with NextJS

I found getting Jest to work with Next required more configuration than I thought. Naive ol’ me assumed I could just install Jest and things would “just work”. After a bunch of trail and error, the end result is relatively simple, but requires several configuration updates. I did not find any official documentation on it, and the only way I could get it to fully work was to use a third party “hack”, but I guess that is modern JS life.

If you tried to add some testing to your Next site and ran into issues, then this post is for you.

TL;DR

I was able to get Jest working inside of Next using Enzyme, a Babel adaptor for Jest, and a third party module that tells Jest to ignore assets that don’t need any transcompilation. Fully working source code is here:

https://github.com/TheRightChoyce/nextjs-jest-starter

Preamble

Jest

Jest is a javascript testing framework. It works out of the box for vanilla javascript, but needs some help to work inside of a React / ES6. I used the babel-jest plugin to help it transpile ES6 code into vanilla js. Note that you do NOT need to explicitly install @babel/core or @babel/preset-env as specified in the Jest docs since Next already includes them.

Enzyme

Enzyme is a utility that helps with testing React components. For any sufficiently meaningful test, you will most likely end up needing to test something that outputs a component (vs just a string or number). This is what Enzyme facilities. 

Jest Transform Stub

This was a small utility I found that helps with CSS and image assets. Without mapping those assets to something (in this case, this module just maps them to an empty string) Jest will force Babel to try and transpile them, which results in several types of errors, but most commonly:

SyntaxError: Unexpected token '.'

  1 | import Head from 'next/head'
  2 | import Image from 'next/image'
> 3 | import styles from '../styles/Home.module.css'
    | ^
  4 |
  5 | export default function Home() {
  6 |   return (

The solution

First:

Install jest and enzyme plus three utilities:

yarn add --dev jest babel-jest enzyme enzyme-adapter-react-16 jest-transform-stub

Here’s what my package.json looks like:

{
	...
  "dependencies": {
    "next": "10.2.0",
    "react": "17.0.2",
    "react-dom": "17.0.2"
  },
  "devDependencies": {
    "babel-jest": "^26.6.3",
    "enzyme": "^3.11.0",
    "enzyme-adapter-react-16": "^1.15.6",
    "jest": "^26.6.3",
	"jest-transform-stub": "^2.0.0"
  }
}

Second

Add a .babelrc file to the root of your project with the following:

{
    "presets": ["next/babel"]
}

Sourced from the babel documentation on the Next website: https://nextjs.org/docs/advanced-features/customizing-babel-config

Essentially Jest needs to know about your Babel configuration in order to use it. Thankfully Next already knows about Babel AND defines a preset configuration for you. By adding the Next/Babel preset to the .babelrc file, you are exposing this preset to Jest (and any other plugin).

Third

Create a jest.setup.js file in your project root that contains the following:

import { configure } from 'enzyme';
import Adapter from 'enzyme-adapter-react-16';

configure({
    adapter: new Adapter()
});

Sourced from the Enzyme docs here: https://enzymejs.github.io/enzyme/docs/installation/react-16.html

Setting up this adapter in your jest.setup.js file allows any tests created in Jest to know about the Enzyme adapter, and then use Enzyme do its magic to allow you to test JSX and React components. You could do this manually in each test file, but setting it up here allows you to setup once and gain access in all tests.

Fourth

Create a jest.config.js file in your project root that contains the following:

module.exports = {
    
    setupFilesAfterEnv: ['<rootDir>/jest.setup.js'], // Setup jest

    testPathIgnorePatterns: ['/node_modules/', '/.next/'], // Don't test any next tests or tests in the modules
        
    transform: {
        '^.+\\.(js|jsx)$': '<rootDir>/node_modules/babel-jest', // babel .js or .jsx files
        "^.+.(css|styl|less|sass|scss|png|jpg|ttf|woff|woff2)$": "jest-transform-stub" // anything style related is ignored and mapped to jest-transform-stub module
    }
}

This config file does two things:

  1. Passes any js or jsx files to Babel for transcompilation
  2. Passes an css, image, or other non-js assets to the jest-transform-stub

The second part was the non-obvious and annoying part to track down. If you look at the source code of the jest-transform-stub module, all it really does is take those non-js assets and return them as empty strings. Without this Jest will barf on images, css files, etc.. WHY is something you should be dealing with? No idea.

For the curious, this stack answer has a bit more detail: https://stackoverflow.com/a/56260594/502572

Finally!

Create a test! Simple tests work fine, but Enzyme’s tooling comes into play once you need to test an actual React component. Here is a quick example:

// Third party imports
import { shallow } from "enzyme";

// Local imports
import Home from '../pages/index';

// Test configuration
describe('Home page', function() {
    test('outputs a component', () => {
        expect(shallow(<Home/>)).not.toBeNull();
    });
});

This simply tests that the Home component exists and can be accessed in Jest. That -should be it! I still need to flush our more tests, but so far so good on my end.

Source code:

Fully working source code for this post is available here:

https://github.com/TheRightChoyce/nextjs-jest-starter

References:

Enzyme / React 16 reference:
https://enzymejs.github.io/enzyme/docs/installation/react-16.html

Jest / Babel reference:
https://jestjs.io/docs/getting-started#using-babel

Next babel reference:
https://nextjs.org/docs/advanced-features/customizing-babel-config

Jest-Transform-Stub:
https://stackoverflow.com/a/56260594/502572
https://github.com/eddyerburgh/jest-transform-stub

Splash image:
Photo by Ferenc Almasi on Unsplash